 Ice King's Crown
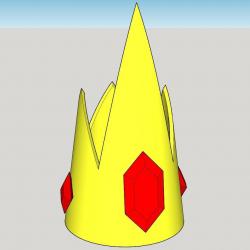 Ice King's Crown
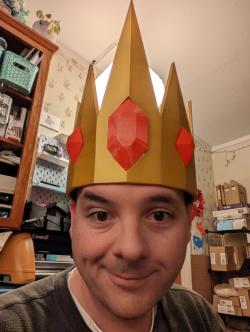 Ice King Crown
 Ice King Crown Adventure Time Fan Art
 Ice King Crown Adventure Time Fan Art
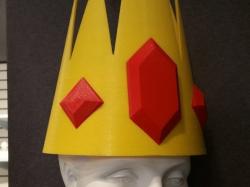 Ice King's Crown - Adventure Time
The Ice King Crown 3D Models
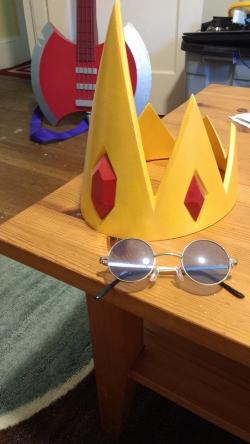
The Ice King Crown is a popular model among 3D printing enthusiasts, especially fans of “Adventure Time.” Various versions of the crown are available for 3D printing, each offering unique features and challenges. Some models are designed as a single piece, ensuring ease of printing and minimizing the need for supports. However, these models often require a large volume printer due to their size.
For a more detailed and customizable experience, some designs include separate jewels that can be resin cast. These models come with mold shells for the jewels, making the process of creating resin casts straightforward. The jewels in these designs are often identical, making the casting process more efficient. It’s essential to pay attention to the volume of resin required – for example, a combined gem volume of 41.8 mL and a combined gem rubber mold volume of 14.8 mL is typical for such designs.
3D Printing Tips for the Ice King Crown
When 3D printing the Ice King Crown, there are several factors to consider:
- Printer Settings: Ensure that your printer settings are optimized for the model. This includes retraction settings to minimize stringing between the crown’s tips.
- Material Choice: Depending on the model, you might need to choose between standard filament or resin for the jewels. Translucent resin can be particularly effective for the gemstones, adding a realistic touch to the crown.
- Sizing and Fit: Some models include a sizing ring, which is essentially the bottom part of the crown, to ensure a proper fit. This is crucial as the crown needs to be comfortable to wear. It’s also important to scale the jewels and their molds correctly if you’re doing resin casting.
- Printing Orientation: The orientation of the crown while printing can significantly affect the final result. Ensure that the orientation minimizes the need for supports and maximizes structural integrity.
Frequently Asked Questions
Q: Can I modify the size of the Ice King Crown 3D model?
A: Yes, most 3D models of the Ice King Crown can be scaled to fit different head sizes. However, ensure that all parts, especially the jewels and their molds, are scaled uniformly.
Q: Do I need a high-end 3D printer to print the Ice King Crown?
A: While a high-end printer can provide better details, many models of the Ice King Crown are designed to be printed on standard consumer-grade 3D printers. However, larger models may require a printer with a larger build volume.
Q: Is it difficult to cast the jewels for the crown?
A: Casting the jewels can be straightforward, especially if the model includes mold shells. Follow the instructions for resin mixing and casting carefully for the best results.
In summary, creating a 3D printed Ice King Crown is an exciting project that blends creativity with technical skill. With the right model, settings, and approach, anyone can bring a piece of