 geordi la forge visor remix
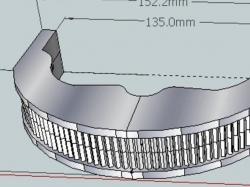 Geordi La Forge's Visor (Star Trek)
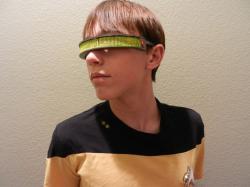 Geordi La Forge Visor--Star Trek: The Next Generation
 Geordi La Forge Visor - Star Trek: The Next Generation
 La Forge Visor
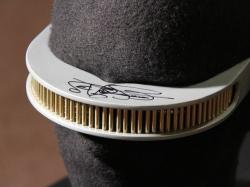 Geordi Laforge Visor
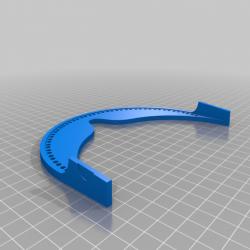
The world of 3D printing opens up endless possibilities for creativity and innovation, and one fascinating project for enthusiasts and Star Trek fans alike is the recreation of Geordi La Forge’s iconic visor. This article will explore various aspects of 3D modeling and printing this unique piece, drawing on information from sources like Sketchfab, MyMiniFactory, and Gambody.
3D Modeling and Design
The first step in creating a 3D printed version of Geordi La Forge’s visor is the design process. Several 3D models are available online, reflecting the distinct design of the visor as seen in Star Trek: The Next Generation. These models vary in complexity and detail, accommodating different levels of 3D printing expertise.
For instance, a model by rossrobotics on Sketchfab showcases the visor with detailed specifications like the number of triangles and vertices, emphasizing the intricate design work that goes into creating such a model. Similarly, Joshua Brown’s design on MyMiniFactory offers a printable face shield visor inspired by Geordi La Forge’s design, highlighting the practical applications of these models beyond mere replication.
Printing Tips and Techniques
When it comes to 3D printing, there are several tips and techniques that can ensure a successful print of the visor. For models with intricate details like the visor’s spines, it’s crucial to adjust the printing speed to avoid nozzle drag and achieve a finer finish. It’s also advisable to keep the infill percentage moderate to prevent the final product from being too heavy, especially for wearable models.
Customization and Finishing
After printing, the next step is customization and finishing. This often involves painting and assembling various parts. For the visor, you might want to use metallic paints to mimic the silver and golden hues characteristic of Geordi La Forge’s visor. As these models are often used for cosplay, the aesthetic finish is just as important as the structural integrity of the print.
Engaging with the Community
The 3D printing community is vibrant and collaborative, with platforms like Gambody and Thingiverse offering a plethora of models and design ideas. Engaging with these communities can provide valuable insights, tips, and even remixes of original models, enhancing your 3D printing experience.
Q&A: Common Queries about 3D Printing the Visor
- Q: What materials are best for printing the visor?
- A: Depending on the printer, PLA or ABS filaments are commonly used. PLA is easier to work with and is ideal for beginners.
- Q: Can the visor be printed in one piece?
- A: This depends on the printer’s build volume. Larger printers can handle one-piece prints, while smaller ones may require assembling multiple parts.
- Q: Is it possible to wear the 3D printed visor?
- A: Yes, but ensure the print is sized correctly for your head and the materials used are comfortable for wear.
Remember, while these models are a tribute to the iconic Star Trek series, they are not endorsed by the show’s creators. They are a testament to the creativity and skill of the 3D printing community, blending passion for sci-fi with the art of 3D modeling and printing. Whether for cosplay, display, or simply as a personal project, creating a 3D printed version of Geordi La Forge’s visor is a rewarding journey into the world of 3D printing and design.