 Shaft & Spring for "Arrietty's Hair Clip"
 Studio Ghibli's Secret World of Arrietty Hair Clip
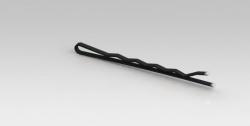 Hair Clip 3D model
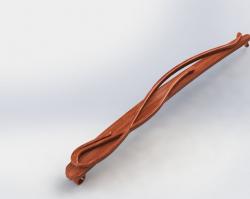 hair clip 3D model
 Hair clip 3D model
 Hair models 3D model
Exploring Arrietty Hair Clip 3D Models
Arrietty’s hair clip, with its intricate design and sentimental value, has become a popular item among 3D modelers and Studio Ghibli fans. The 3D models of this hair clip are designed with close attention to detail, mirroring the aesthetic seen in the film. These models are available on various platforms like Printables, where enthusiasts can download them for personal 3D printing projects.
Creating the Perfect Print
3D printing an Arrietty hair clip involves several steps. Firstly, selecting the right material is crucial. A filament like PLA is often recommended for its ease of use and fine detailing capabilities. When setting up your 3D printer, consider a nozzle size of around 0.4mm, which is ideal for capturing the delicate aspects of the hair clip design.
The printing process requires a balance between resolution and printing time. A layer height of 0.2-0.3mm is a good starting point, providing a smooth finish without excessively prolonging the print time. Infill settings are also important; a range of 15-30% infill works well, offering enough internal support while conserving material.
Assembly and Finishing Touches
After printing, some assembly might be required, depending on the design. This could involve inserting a rod or spring to connect different parts of the clip. For a truly authentic look, consider painting the clip in vibrant colors that match those in the movie.
Tips for Successful 3D Printing
- Temperature Control: Ensure your printer’s bed and nozzle are at optimal temperatures to prevent warping or misshaping.
- Support Structures: For overhanging parts, use support structures to maintain the integrity of the design during printing.
- Post-Processing: Sanding and painting your print can significantly enhance its appearance, making it look more like a high-quality replica.
Q&A: Common Queries About 3D Printing Arrietty’s Hair Clip
- Q: What is the best material for 3D printing an Arrietty hair clip? A: PLA is recommended for its ease of use and ability to capture fine details.
- Q: Do I need supports for printing this model? A: Yes, especially for designs with overhangs or intricate details.
- Q: Can I modify the design of the hair clip? A: Absolutely! Customization is one of the joys of 3D printing. Feel free to modify the design to suit your preferences.
In conclusion, creating an Arrietty hair clip through 3D printing is a delightful project that blends the magic of Studio Ghibli with the innovative world of 3D modeling. With the right tools, settings, and a bit of creativity, you can bring a piece of this enchanting world into your own. Remember, the key to a successful print lies in careful preparation, meticulous printing, and a touch of post-processing magic. Happy printing!